Onboard to Twilio Engage
Twilio Engage brings Segment, Twilio, and SendGrid together to help you create and send email and SMS campaigns to your customers.
Before sending your first Engage campaign, though, you’ll need to configure and connect accounts with all three platforms.
This guide lists all required onboarding steps and walks you through Engage setup. By the end of the onboarding process, you’ll be ready to send your first campaign.
Before you begin: overview and task checklist
You’ll set up Twilio Engage in three stages:
- Configure Personas Identifiers in your Segment workspace.
- Create and configure a SendGrid account.
- Create and configure Twilio SMS services.
The following table shows a high-level checklist of tasks you’ll need to complete in each platform:
| Platform | Tasks |
|---|---|
| Segment | 1. Check your Personas workspace for Engage identifiers. 2. Add any missing identifiers. |
| SendGrid | 1. Create a SendGrid account. 2. Upgrade your account to a Pro plan. 3. Configure an IP. 4. Create a SendGrid subuser. 5. Authenticate your domain. 6. Enable subscription tracking. 7. Enable an event webhook. 8. Generate an API key, then copy it into the Engage settings. 9. Enable automated IP warmup. 10. Contact the Twilio Engage team. |
| Twilio | 1. Create a Twilio account. 2. Purchase phone number(s). 3. If necessary, register phone number(s). 4. Create a messaging service. 5. Generate an API key, then copy it into the Engage settings. 6. Configure an event webhook. |
Several onboarding steps require copying and pasting information between Segment and SendGrid or Twilio. To streamline setup, open your Personas workspace in one browser tab and open two others for tasks you’ll carry out in SendGrid and Twilio.
Continue reading for a detailed, step-by-step breakdown of each onboarding stage.
Stage 1: Configure Personas Identifiers in segment
Through identity resolution, Segment uses the email and phone traits to identify users who can receive your Engage campaigns. To begin using Engage, you’ll need to verify that these identifiers exist in your workspace and add them if they don’t.
Follow these steps to configure the traits:
- In your Segment workspace, navigate to Personas > Settings > Identity Resolution.
- Under the Identity Resolution Configuration table, verify that
emailandphoneappear under the Identifier column. If so, your Personas space is configured correctly; skip to create and configure a SendGrid account. - If either identifier is missing, click the Add Identifier button.
- In the New Custom Identifier modal, add the first missing trait (
emailorphone) in the Trait/Property key field, then click Add Identifier. - If both traits were missing, repeat Step 4 and add the other missing trait (
emailorphone). Finish by clicking Add Identifier.
Your Segment workspace is now configured for Engage. Next, you’ll create a SendGrid account and connect it to Segment.
Stage 2: Create and configure a SendGrid account
SendGrid powers delivery of your Engage email campaigns. During this stage of onboarding, you’ll create and set up a SendGrid Pro account. You’ll then configure SendGrid and Personas to enable both subscription tracking and an event webhook.
Create your SendGrid Pro account
Start by creating a SendGrid account and then upgrading to the SendGrid Pro Plan:
- Visit the SendGrid website and sign up for an account.
- Within your SendGrid space, navigate to Settings > Account Details > Your Products.
- Under the Email API section, select Change Plan.
- On the Email API Plans page, select a Pro option that fits your anticipated sending needs.
- Add the Pro option to your cart, and complete checkout.
Upgrading to SendGrid Pro
Upgrading to a SendGrid Pro account may require additional action on your part. Follow the instructions in SendGrid’s account upgrade guide to complete your upgrade.
Create a subuser and check the dedicated IP address
Next, you’ll create a SendGrid subuser and ensure that a dedicated IP has been assigned:
- In your SendGrid space, navigate to Settings > Subuser Management, then click Create New Subuser.
-
In the Create New Subuser window, create a username for the subuser, then add an email address and password. Your SendGrid subuser username must begin with the prefix
twilio_engage_app_. Add a unique identifier to the end of the prefix, for example,twilio_engage_app_someusername.
- In the same window, click the checkbox next to the dedicated IP address for the subuser.
- Fill out the remaining fields in the window, then click Create Subuser.
- Using SendGrid’s documentation, warm up the IP address.
Authenticate your domain
SendGrid parent and subuser accounts
In this section, you’ll authenticate your domain using your new SendGrid subuser account and then set up reverse DNS with your SendGrid parent account. Have both login credentials on hand before proceeding.
Now, you’ll authenticate your domain with SendGrid and your DNS provider and enable link branding. Domain authentication protects your sending reputation by showing email providers that you’ve given SendGrid permission to send email campaigns for you.
To authenticate your domain, you’ll copy CNAME records given to you by SendGrid and paste them into your DNS provider. Before you begin, verify that you have the necessary permissions to add CNAME records to your DNS. If you’re not sure if you have the right permissions, reach out to your organization’s IT department.
You’ll authenticate your domain using the SendGrid platform and your DNS provider:
- From your new SendGrid subuser account, follow SendGrid’s domain authentication guide.
- During the authentication process, SendGrid asks if you would like to brand links for your domain. Select Yes.
- SendGrid provides you with five CNAME records. Add them to your DNS host.
- Return to SendGrid and verify your DNS.
Complete authentication by setting up reverse DNS:
- From your SendGrid parent account, follow SendGrid’s reverse DNS (rDNS) documentation.
- SendGrid provides you with one A record. Add it to your DNS host, along with the five CNAME records from the previous steps.
- Return to SendGrid and verify your DNS.
Enable subscription tracking
You’ll also need to enable subscription tracking, which keeps records of users who unsubscribe from your email campaigns:
- Within your SendGrid space, navigate to Settings > Tracking.
- Under the Settings column, click Subscription Tracking.
- At the end of the Subscription Tracking window, toggle Setting State to
enabled. - Click Save.
Enable event webhook
You’ll now need to enable event webhooks, which trigger webhook notifications for campaign-related events like clicks and opens:
- Within your SendGrid subuser space, navigate to Settings > Mail Settings.
- Click the pencil edit icon next to Event Webhook.
- On the Event Webhook page, set authorization method to none.
-
Copy and paste the following URL into the HTTP Post URL field:
https://engage-ma-webhook-api.engage.segment.com/sendgrid
- Check all event types.
- Switch the Event Webhook Status toggle to
Enabled. Click Save.
Generate an API key
Copying SendGrid Credentials
This step creates an API key that you’ll later add to Segment. Make sure you’re ready to copy and save the key before proceeding; SendGrid only displays the API key once. You must follow these steps from within the SendGrid subuser account you created for use with Twilio Engage.
Next, generate an API key within SendGrid. Have your Segment workspace open in another tab, as you’ll copy the API key and paste it into your Engage settings.
- Within your SendGrid subuser space, navigate to Settings > API Keys.
- Click the Create API Key button.
- In the Create API Key window, name your API key using the prefix
twilio_engage_app_, with a suffix of your choice added to the end, liketwilio_engage_app_example. - Select the Full Access radio button.
- Click Create & View. Copy the API key to your computer’s clipboard.
To finish linking the API key to your Segment account, follow these steps:
- Switch to the browser tab with your Personas workspace open.
- Navigate to Personas > Settings > Messaging Service. Under Send emails with SendGrid, click the Get Started button.
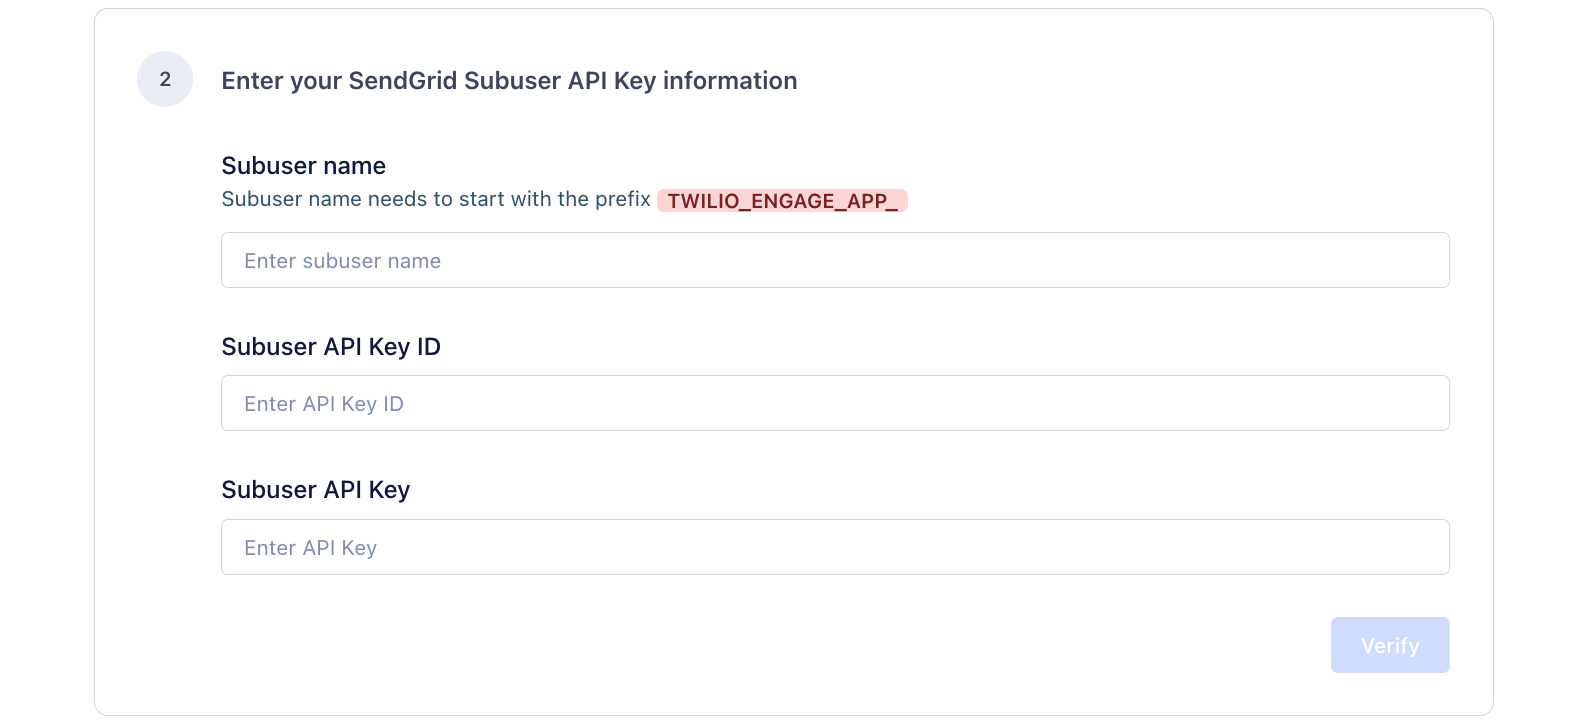
- In the Set up your email service window (shown below), enter the subuser username you previously created into the Subuser name field.
- Paste the Subuser API Key ID and Subuser API Key you just copied from SendGrid into their respective fields, then click Verify.

Enable Automated IP warmup
Required Step
Notify the Engage team once you’ve completed IP warmup.
To finish configuring your SendGrid account for usage with Twilio Engage, you’ll enable automated IP warmup. As a best practice, only warm up your IP when you’re ready to begin sending campaigns.
To enable IP warmup, follow these directions:
- Within your SendGrid space, navigate to Settings > IP Addresses.
- On the Dedicated IP Addresses page, click the pencil edit button next to your Engage IP address.
- Under Additional options (pictured below), check Use Automated IP warmup and Allow my subusers to send mail using this IP address. Click Save.
- Required: Reach out to the Engage team. Let them know you’ve enabled IP warmup.
Your SendGrid account is now fully configured and ready to use with Engage. You’re ready to move to Stage 3 and configure Twilio SMS.
Stage 3: Create and configure Twilio SMS services
To add the ability to send SMS campaigns in Engage, you’ll now create a Twilio account, generate an API key, set up a phone number and messaging service, and configure event webhooks.
Create a Twilio account and generate an API key
Copying Twilio Credentials
This step generates an Account SID and API key secret that you’ll later add to Segment. Make sure you’re ready to copy and save both proceeding.
Start by creating your Twilio account and getting an API key for Engage:
- Visit the Twilio website and sign up for a paid account. Trial accounts will generate sending errors.
- In your Twilio console, select the Account dropdown menu, then API keys & tokens.
- On the Auth Tokens & API Keys page, click Create API key.
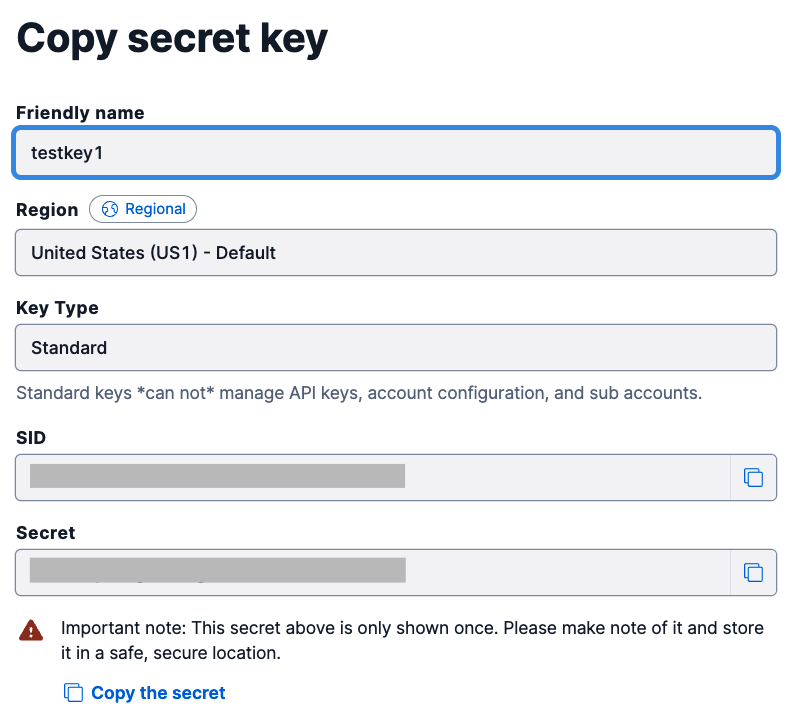
- Enter a name for the API key in the Friendly name field.
- Set the region to United States (US1) - Default and key type to Standard.
- Click Create API Key.
-
Copy the SID and Secret field contents.

- Switch to the browser tab or window with your Personas workspace.
- Navigate to Personas > Settings > Messaging Service. Under Send SMS messages with Twilio, click the Get Started button. The Set up your SMS service page appears.
- Under Enter your Twilio API Key information (shown below), paste the SID and API Key Secret you copied above into their respective fields.
-
Click Verify, then click Save Twilio Account.

If you’re unable to verify your SID or API Key secret, you may have copied an extra space at the end of one or the other. Verify that you’ve not added any extra characters or spaces, then try to verify again.
Set up a Twilio Messaging Service
Phone Number Registration
You’ll need to purchase a phone number to set up Twilio Messaging. Depending on the phone number type you purchase, you may have to register the number. Before completing this section, read Twilio’s documentation on short code, long code, and toll free numbers.
Once you’ve identified the type of phone number you’ll use with Twilio Engage, follow these steps to create a Twilio Messaging Service:
- Purchase a phone number within your Twilio Console. If necessary, register the number.
- In the Twilio Console side menu, navigate to Messaging > Services.
- On the Messaging Services page, click Create Messaging Service.
- Enter a name for your Messaging Service.
- Under the Messaging use dropdown, select Market my services.
- From the Sender Pool tab, click Add Senders, then select the phone number you purchased in Step 1. Click Step 3: Set up Integration. Leave this tab open.
To finish setting up your Messaging Service, you’ll now configure an event webhook:
- Switch to the browser tab or window with your Personas workspace.
- Navigate to Personas > Settings > Messaging Service. Under Send SMS messages with Twilio, click the Get Started button.
-
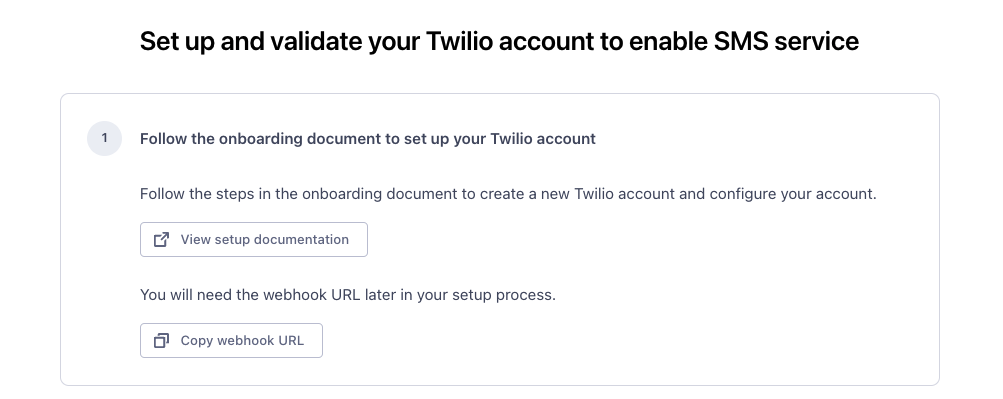
A Set up your SMS service overlay appears (pictured below). Click the Copy webhook URL button. Your computer copies the URL to your clipboard.

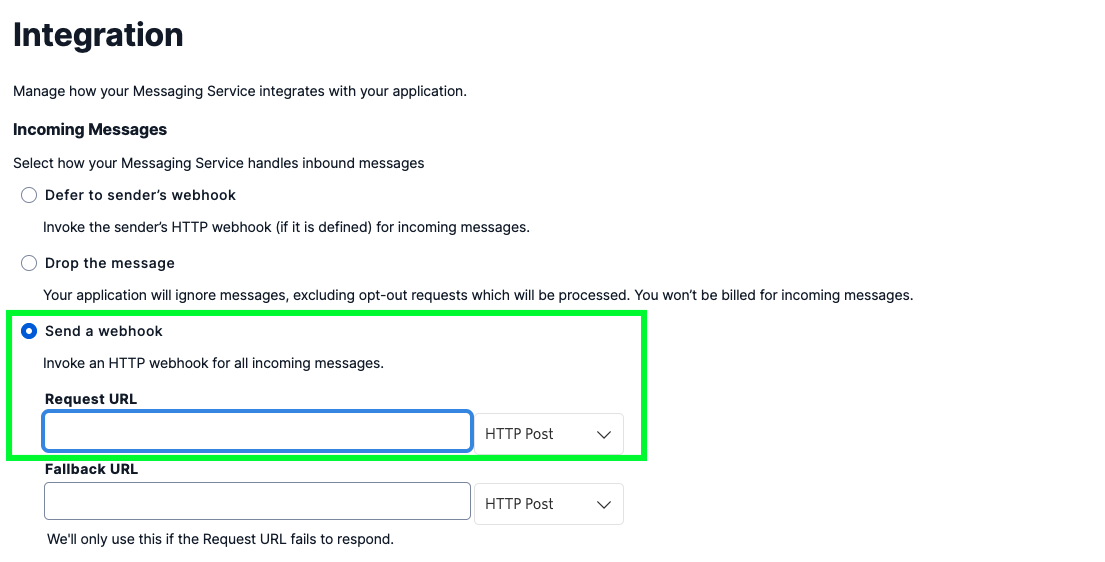
- Return to the Twilio Messaging Service setup tab. On the Integration page, select the Send a webhook radio button.
-
Paste the URL you copied in Step 3 into the Request URL field (pictured below).

- Verify that the dropdown next to the Request URL field is set to HTTP Post.
- (If applicable:) Click Step 4: Add compliance info. Finish compliance setup, then click Complete Messaging Service Setup.
You’ve now configured both your SendGrid and Twilio accounts, and you’re ready to begin sending Engage campaigns.
Next steps
With accounts on all three platforms configured, you’ve completed Engage onboarding and are ready to create and send campaigns to your users.
Not sure where to start? Read the Engage documentation on sending email campaigns and sending SMS campaigns. To save time when generating Engage campaigns, check out the Engage guides on creating SMS templates and email templates.
If you’re planning to import contacts to Engage, learn how to update your audiences with a CSV file.
This page was last modified: 12 May 2022
Twilio Engage Beta Support
Contact support with any questions or issues with the Twilio Engage Beta